Overview
This article will show you how to set up email on your iOS-based devices, such as an iPhone or iPad.
To view the correct settings for your email account, log in to your Bluehost control panel and go to the Email tab and select Email Configuration from the side menu.
- Configure Your iOS Device
- New Account Information
- Incoming Mail Server
- Outgoing Mail Server
- Cannot Verify Server Identity
- Mail and Notes
- How to store Sent, Drafts, and Trash on the server
Configure Your iOS Device
- From the Home screen, tap the Settings icon.
- On the Setting, scroll down and click Mail.
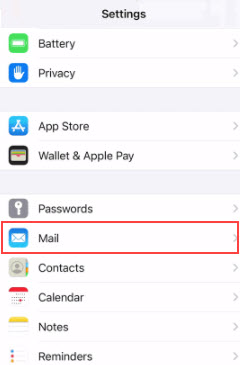
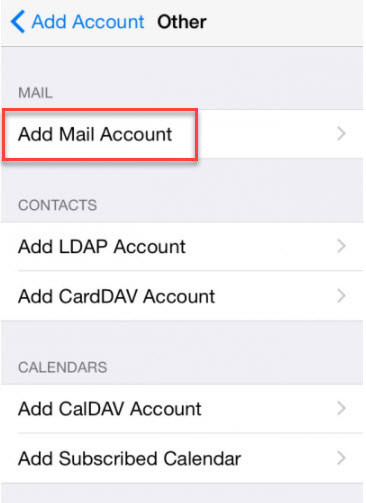
- Tap Add Account.
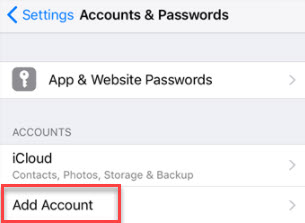
- Choose Other.

- Choose Add Mail Account.
New Account Information
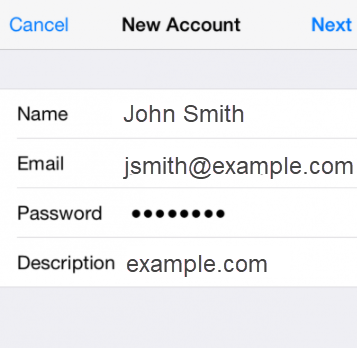
- Enter your name.
- Enter your email address.
- Enter the password for your email address.
- Enter any description or domain name.
- Once done, click Next.
Refer to the Email Client Settings below, and based on your preferences, enter the respective hostnames, port numbers, and encryption methods for the Incoming Mail and Outgoing Mail servers.
| Email Client Settings | |
| Outgoing Server SMTP | mail.domainname.com |
| Incoming Server IMAP | mail.domainname.com |
| Incoming Server POP | mail.domainname.com |
Incoming Mail Server
The server that lets you receive email is called an incoming, POP, or just Mail server. Please follow the configuration below:
- Host Name. This is typically your domain name preceded by “mail.” You can find your specific mail server. This can be found in the E-mail Accounts section of the control panel, under More > Configure Mail Client.
- User Name. Your email address.
- Password. The password for your email address.
Outgoing Mail Server
This server that lets you send email is called an outgoing, or SMTP mail server. Please follow the configuration below:
- Host Name. The same as the incoming server.
- User Name Your email address.
- Password. The password you use to access your email account.
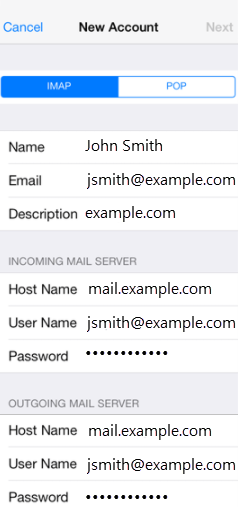
Once you’re done, click Next on the upper left corner.
Cannot Verify Server Identity
This error message occurs because the certificate is for Bluehost instead of your domain. Click continue to accept the certificate.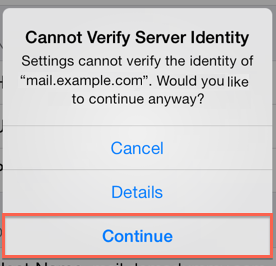
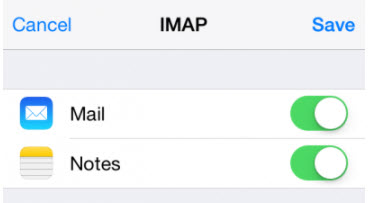
Mail and Notes
The final screen will ask if you want to mail and notes turned on for this account. Leave them both on and tap Save.
- Leave Mail and Notes set to on.
- Then click Save.
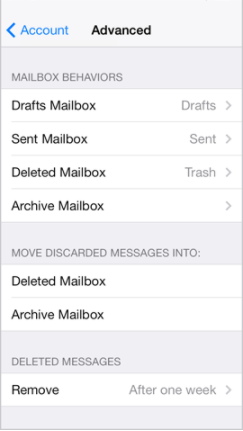
How to Store Folders on the Server
- Go to Settings and click Mail.
- Choose your email account.
- Scroll down to Advanced.
- Under Mailbox Behaviors, choose the mailbox you wish to configure.
- Choose the corresponding folder on the server you wish to save the email in.
- Repeat the above steps for any other folders you wish to store on the server.